HOW TO VIEW MY WEBMAIL IN GMAIL
The term “webmail” refers to the email account(s) that come with your website, for example: info@yoursiteaddress.com. It is my opinion that using an email that is @your-own-sitename.com is more professional than using a gmail.com or yahoo.com email. Most web hosting companies provide the webmail as a vital part of their web hosting service, so it is 95% likely that, if you already have a website, you do have webmail access.
It is however sad to note that even those website owners who are aware that the webmail service is available to them seldom ever use it. I know this because I build and manage websites, and am myself a website owner. Majority, over 95%, of site owners who would really love to use the webmail service don’t because they don’t know how to. If you are in this category, this post was written because of you. Let’s get to it.
The steps below will show you how to access your webmail in Gmail.
In this example, we are assuming the email address you want to check is info@yoursitename.com (where your website address is www.yoursitename.com).
- Login to your Gmail Account.
- In the top right hand corner, open the Settings cog and choose Settings.

- Click on Accounts and Imports tab at the top.
- Locate the ‘Check mail from other accounts‘ setting and click Add a mail account.
- Enter your Email address.
- Click the Next button.
- Enter your full email address as the Username.
- Enter Password for your email account.
- Enter the POP Server. This will vary depending on if you choose to use the Always use a secure connection (SSL) option
- Without SSL: This will be your domain name preceded by “mail.”
- With SSL: This will be your servers hostname. Also make sure the port is changed to 995. If you don’t know your servers hostname, go to your cpanel. On the left side you will see a section called stats. Click the expand stats link if it is present. The hostname will be shown in the list of stats.
- Choose any additional options you may want.
- Click the Add Account button.
Outgoing Mail (SMTP)
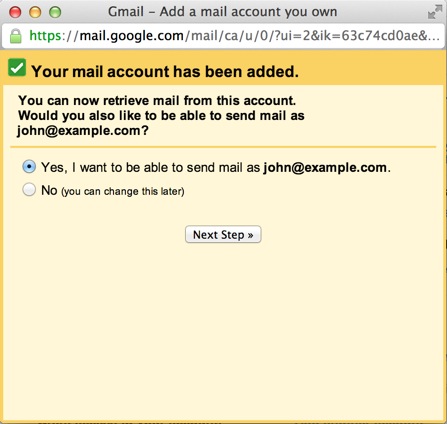
- Select ” Yes, I want to be able to send mail as john@example.com” then click on the “Next Step” button.

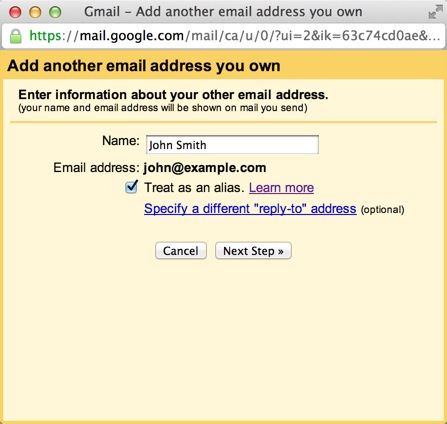
- Choose if you will use this address as an Alias.If you’d like to know more about Aliases in Gmail please go here Googles Knowledge Base Article

- Click the Add account button.
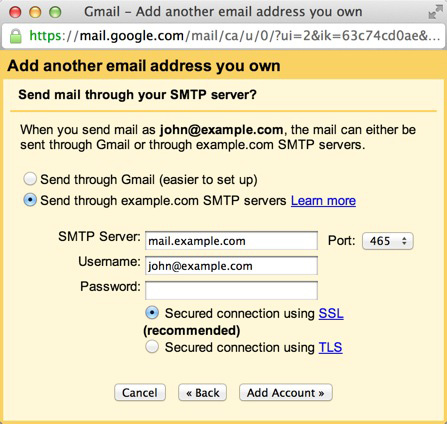
- Choose to send “Send through example.com SMTP server”
- Enter the SMTP Server.
- Without SSL: This will be your domain name preceded by “mail.”
- With SSL: This will be your servers hostname. If you don’t know your servers hostname, go to your cpanel. On the left side you will see a section called stats. Click the expand stats link if it is present. The hostname will be shown in the list of stats.
- Enter your full email address as the Username.
- Enter Password for your email account.
- Choose Port 25 (Non SSL) or 465 (SSL).


